
Introductions
Hello CMP students, my name is Anthony Spencer and I am going to tell you how to make a very, very basic chatroom by utilizing the popular JavaScript add-on, Node.js and popular web hosting service, Render!
What This Program does
This program is a simple one that utilizes three main things:
- Node.Js
- WebSockets
- Render
It uses Render – A free server hosting website – to host a Node.js server which handles any response or request from the client. You can find a more advanced version of the program here. The program you will be making during this tutorial is going to be a very basic one, and If you so choose to, you can modify the code to run using Socket.IO instead of Web-sockets.
Getting Started
Requirements
In order for one to create a web socket application, you must first have a few things:
- A code editor, such as Visual Studio Code. This will be used to create and edit your code.
- Node.js. This will be used to handle the bidirectional communication web sockets provides.
- A Render account. This will be used to host a server that your Node.js will be hosted on.
- A GitHub Account. This will be used to hold your projects repository and host your website.
Please keep in mind everything that I am documenting was programmed inside of Ubuntu Linux, a free and open source operating system for you to use. Everything contained should run just fine off of a Windows 10/Windows 11 computer.
Node.js
if you do not have Node.js installed, simply head to the the previous section and follow the link or run the following code in the terminal:
sudo apt install npmAfter simply go into Visual Studio Code (VSC) and open the terminal.
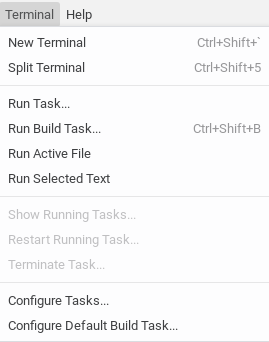
Click on new terminal and at the bottom, a development terminal should open at the bottom. Inside of it type:
npm install wsThis will install the web socket dependencies you need to run a local node development server on your machine. We will be using the following code to run the basic server:
//You need to include this so that you can use the "ws" variable and its commands
const WebSocket = require("ws");

//This simply creates a server
const wss = new WebSocket.Server({ port: 8080 });

//This is the code that runs when a websockets client connects to our server
wss.on("connection", (ws) => {
   //This will log into the terminal that someone has connected
   console.log("A new client connected!");

   //This is the event that fires when the server receives the message
   ws.on("message", (message) => {
      console.log(`Received: ${message}`);

      // Broadcast the message to all connected clients
      wss.clients.forEach((client) => {
         if (client.readyState === WebSocket.OPEN) {
            //If you do not encase the code in a back-ticks, the code will appear as an [OBJECT: blob]
            client.send(`${message}`);
         }
      });
   });

   ws.on("close", () => {
      console.log("Client disconnected");
   });
});

console.log("Basic Server is running on ws://localhost:8080");
After that, run the following command in the terminal:
npm init --yesNow, you have created a very, very basic server to run your websocket chat application on and a package.json file. This will only send the most basic of information, however, it is not encrypted and very un-secure, so I would highly advice that you do you own research on how to improve this server. Now, we will continue onto the HTML and CSS part of this.
The UI
The UI is a very simple, and if you choose too then you can make your own; however, if you want a very simple design for the UI, simply copy the following code and paste:
HTML
<!DOCTYPE html>
<html>

<head>
  <title>WebSocket Chat</title>
  <link rel="stylesheet" href="style.css">
</head>

<body>
  <div id="chat-container">
    <div id="chat"></div>
    <div id="input-container">
      <input id="messageInput" type="text" placeholder="Type a message..." />
      <button id="sendButton" onclick="sendMessage()">Send</button>
    </div>
  </div>
  <script>

  </script>

</body>
</html>
CSS
body {
   font-family: Arial, sans-serif;
   background-color: #f0f0f0;
   margin: 0;
   padding: 0;
   display: flex;
   justify-content: center;
   align-items: center;
   height: 100vh;
}

#chat-container {
   width: 400px;
   background-color: #fff;
   box-shadow: 0 0 10px rgba(0, 0, 0, 0.1);
   border-radius: 5px;
   overflow: hidden;
   display: flex;
   flex-direction: column;
}

#chat {
   flex: 1;
   padding: 10px;
   overflow-y: auto;
   border-bottom: 1px solid #ddd;
}

#chat div {
   margin-bottom: 10px;
   padding: 8px 12px;
   background-color: #f1f1f1;
   border-radius: 4px;
}

#input-container {
   display: flex;
   border-top: 1px solid #ddd;
}

#messageInput {
   flex: 1;
   padding: 10px;
   border: none;
   border-top: 1px solid #ddd;
   font-size: 16px;
   outline: none;
}

#sendButton {
   padding: 10px 20px;
   border: none;
   background-color: #007bff;
   color: white;
   font-size: 16px;
   cursor: pointer;
}

#sendButton:hover {
   background-color: #0056b3;
}
This is a very basic User Interface, as it includes the bare minimum of features for the purpose of demonstration.
The Backend
Now, in order for us to create a bidirectional connection, we need to have both the server and client be able to connect to each other. To do this we will be using the built in web sockets functions included with JavaScript. You should put the following code inside of the <script> brackets at the bottom of the UI:
// Use your Render URL here (You'll learn more about this in the next segment)
const ws = new WebSocket('wss://your-app.onrender.com');

    //This puts into the console output that you have successfully connected to the server
    ws.onopen = () => {
      console.log('Connected to the server');
    };

    //This is what happens when the send event gets called by the sendButton.
    ws.onmessage = (event) => {
      const chat = document.getElementById('chat');
      const message = document.createElement('div');
      message.textContent = event.data;
      chat.appendChild(message);
      chat.scrollTop = chat.scrollHeight;  // Scroll to the bottom
    };

    //This occurs when you disconnect from the server (whether intentionally or not)
    ws.onclose = () => {
      console.log('Disconnected from the server');
    };

    //This is the function we give the "sendButton" to activate on click
    function sendMessage() {
      const input = document.getElementById('messageInput');
      ws.send(input.value);
      input.value = '';
    }

    // Send message on Enter key press
    document.getElementById('messageInput').addEventListener('keypress', function (e) {
      if (e.key === 'Enter') {
        sendMessage();
      }
    });
Now in this code you may have noticed the
const ws = new WebSocket('wss://your-app.onrender.com'); This code right here is going to be modified later on, as we will be using this to connect to the online server we make using Render. For now, upload you code to github under a recognizable name.
Github Pages
After you upload the three files to GitHub, go into the repository and click on Settings, then Pages. You should see a screen similar to this:
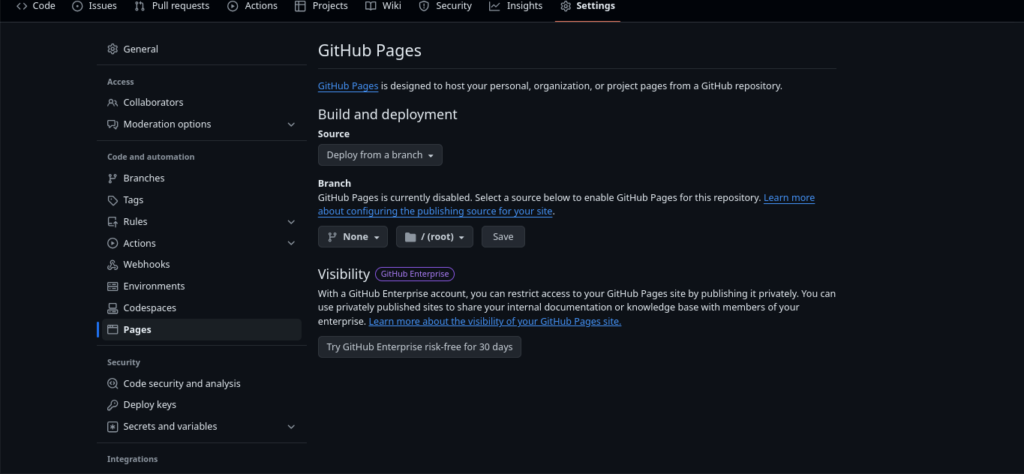
Under Branch, change the None tab to your master branch and then wait. After a few minutes go by, you should receive a message similar to this:
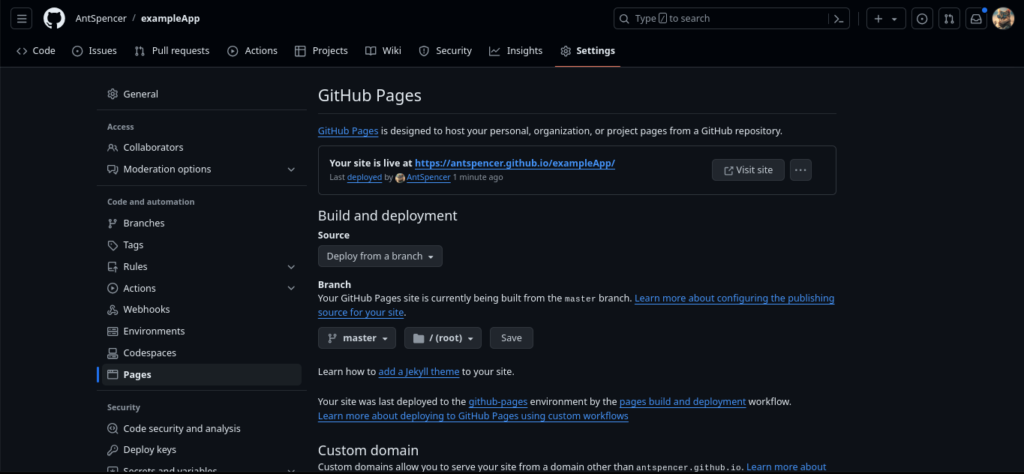
Voila! You have just created your very own website! Now, you are not done working on the code, even though you have published it. You now have to add your online Render server into the mix to fully get all the functionality you want.
Render
For those who are unfamiliar, Render is a free server hosting website. It contains three plans for its usage:
- The Pro Plan
- The Regular Plan
- The Free Plan
For now, use the free plan. What your going to want to do is create or login to Render. After that, go to the dashboard. You should see a screen similar to this:
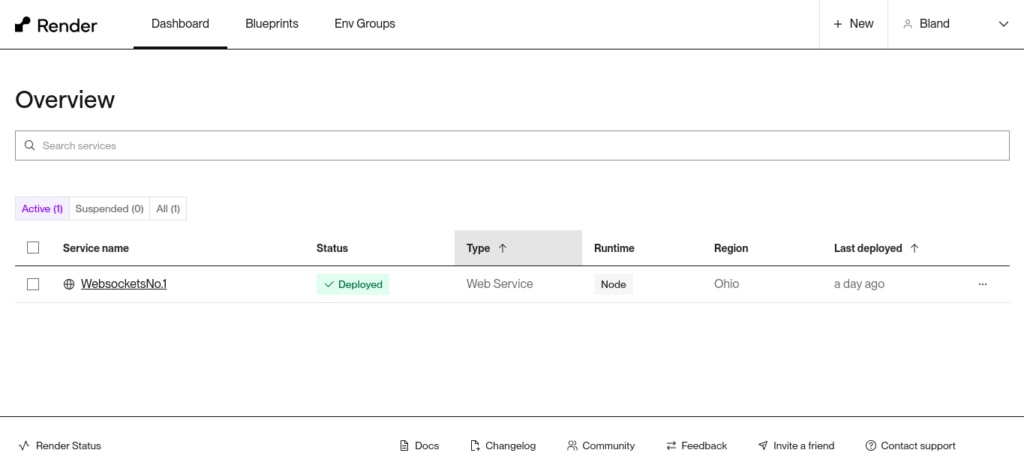
This is your dashboard. Any time you make a render server and deploy it, it will be on here.
Click on the + New button that is located to the left of your username and click on Web Service. This is going to be your website. It needs to be deployed as a Web Service, or else you will not be able to host your server. Click on Build and Deploy from an Existing Repository. Connect to the repository you made for this project. Make sure you change the Build Command from:
yarn installto:
npm installThis will make the server automatically install all dependencies it needs to run. Make sure you select the free when selecting the instance type. You now have a basic online server! From there, copy the link at the top left corner of your screen. Change the example code to include the link.
Before:
const ws = new WebSocket('https://exampleapp-ppvl.onrender.com');After:
const ws = new WebSocket('https://exampleapp-ppvl.onrender.com'); Save the file, commit it to GitHub, and voila! You have completed the tutorial on your basic Web-socket application!
Useful Things to know
Terms:
- npm: Node Package Manager
- ws: Web-Socket
Things to learn:
- Basic to intermediate understanding of HTML, CSS, and JavaScript
- Basic understanding of server side scripting
Hey, great tutorial but your github repo is down so it would be hard to compare code without it