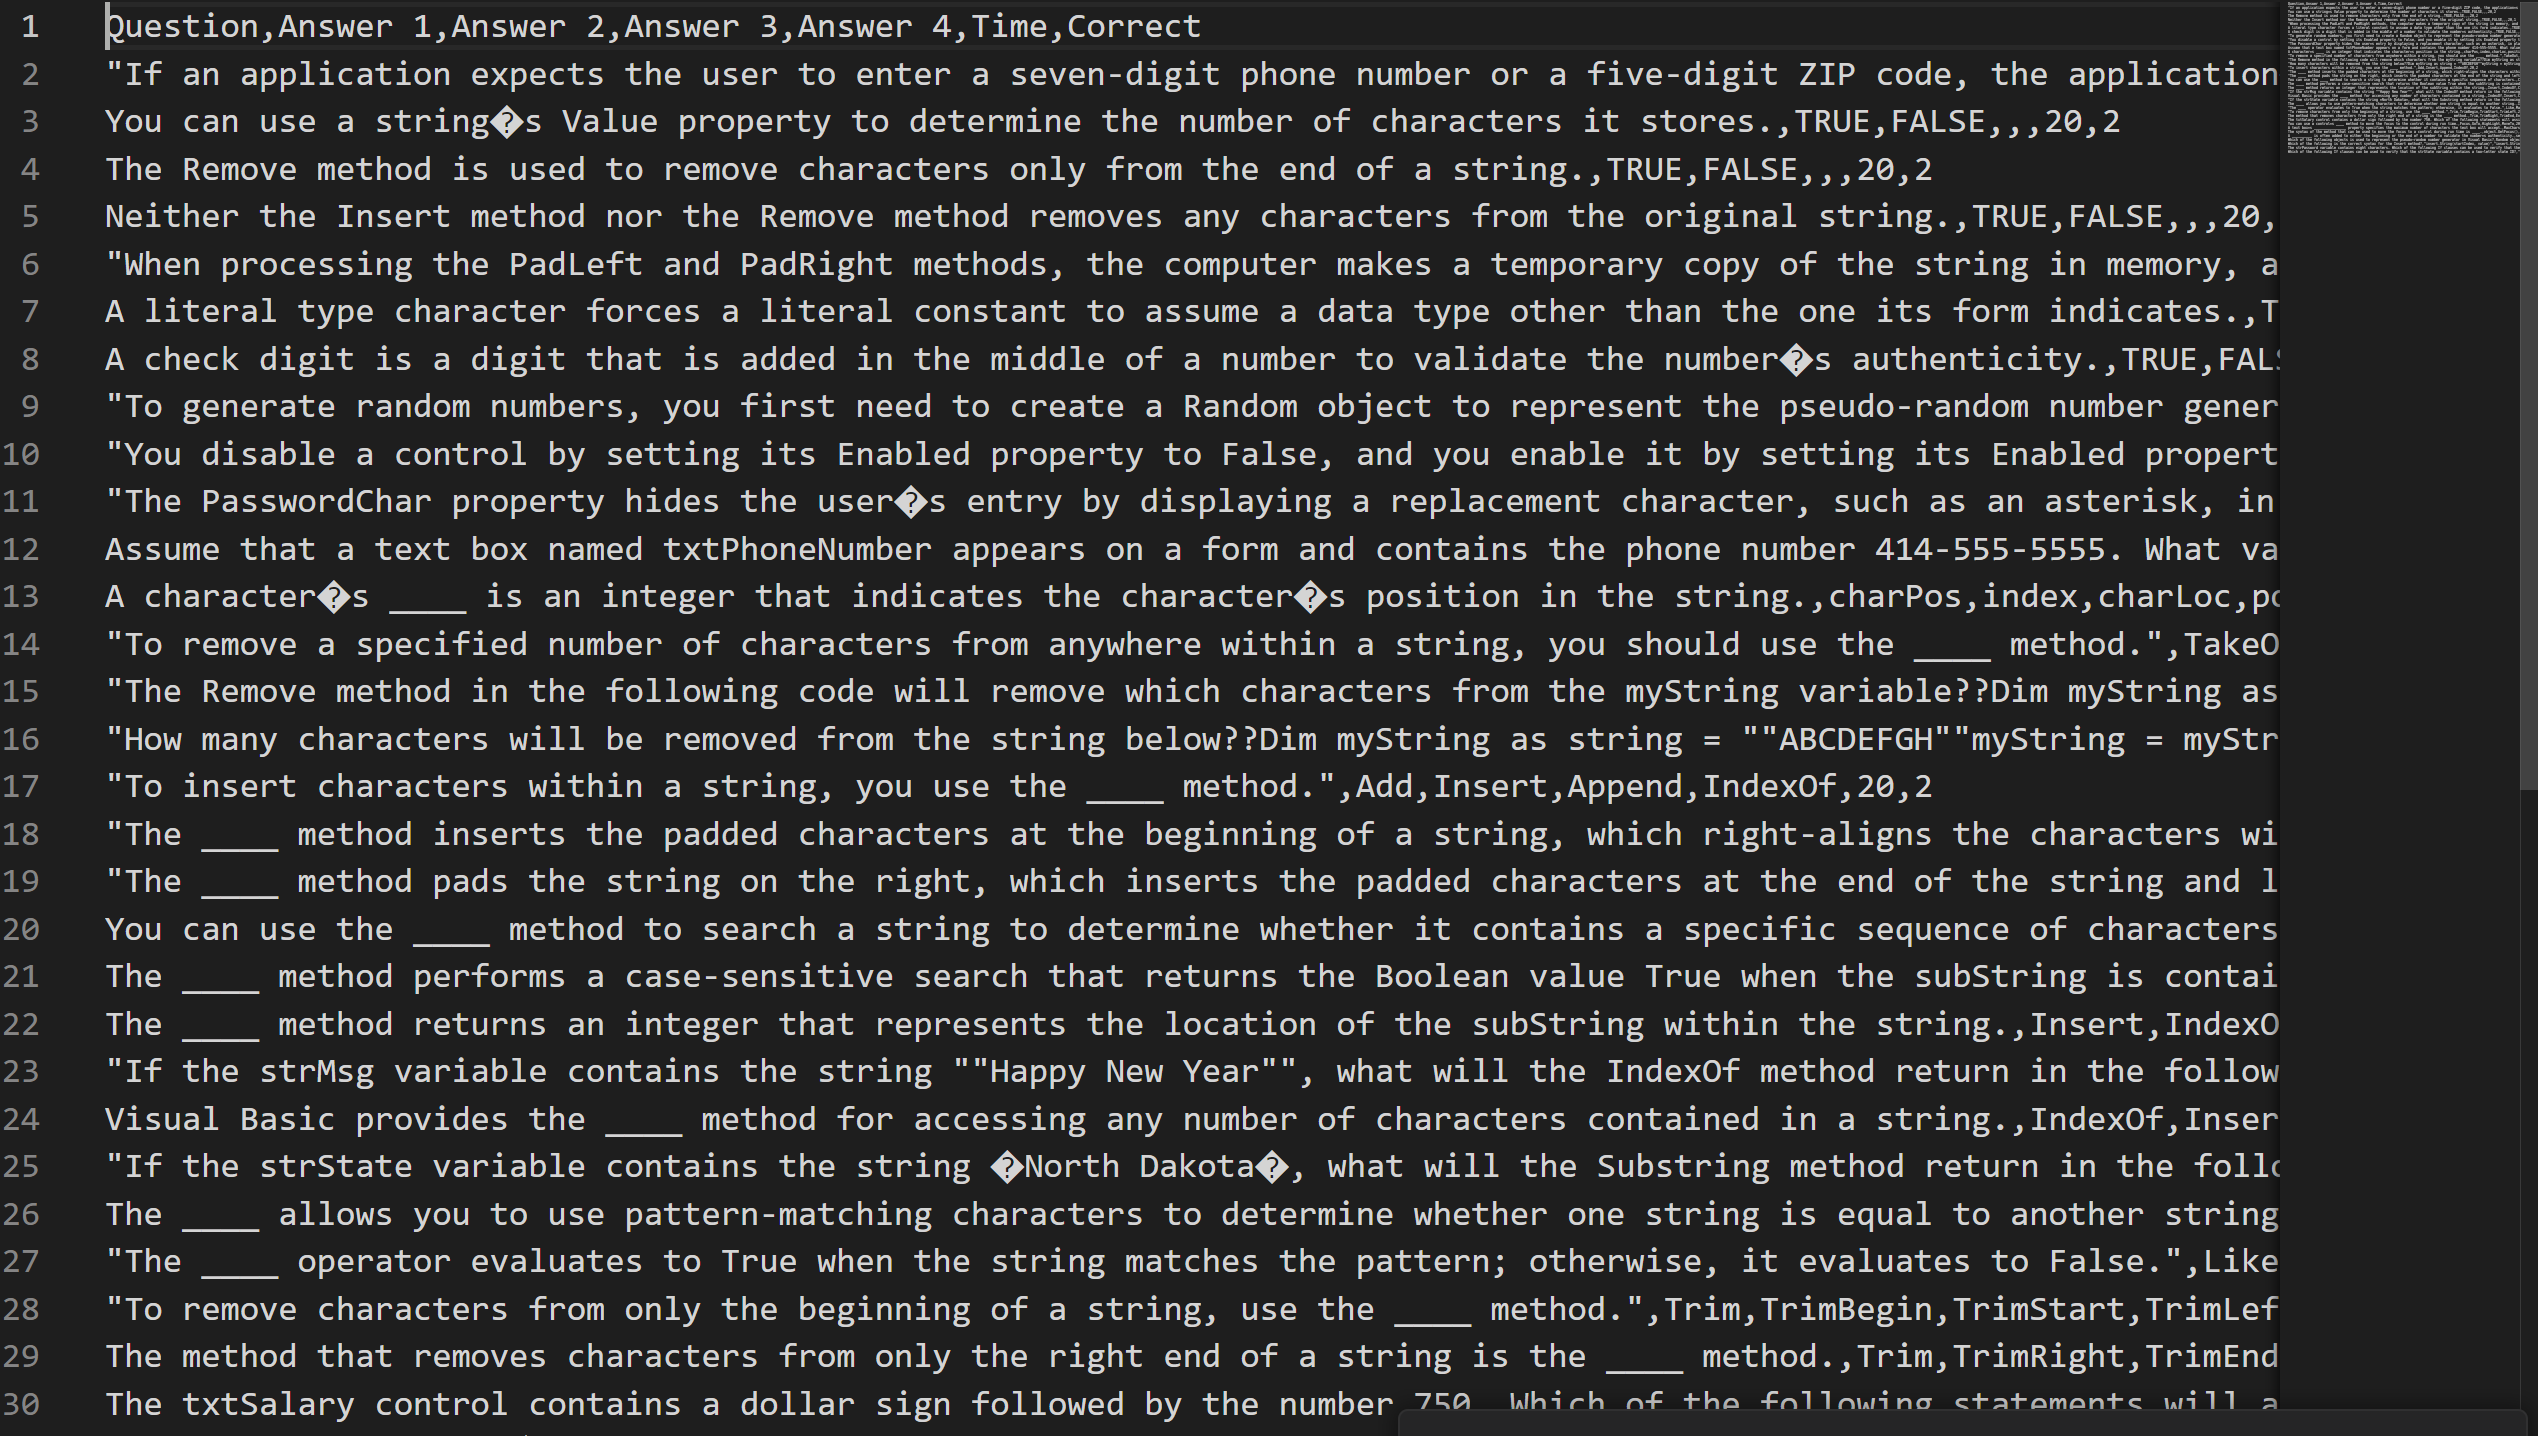
In VB.NET, reading data from a text file can be done using the TextFieldParser class. This class provides a convenient way to parse through delimited or fixed-width text files. In addition, the OpenFileDialog class can be used to open a file dialog box and allow the user to select the file they wish to read from. In this article, we will explore how to use the TextFieldParser and OpenFileDialog classes together to read data from a .csv file in VB.NET. We will be parsing csv files with the Kahoot format used in class. The Kahoot CSV and format can be found in this pastebin.
OpenFileDialog
To get started, we need to add the necessary imports at the top of our code file. These will include the following:
Imports Microsoft.VisualBasic.FileIO
Imports System.IO
If you don’t do this, your code may not work.
Then, place a Button or ToolStripMenuItem on your form and customize it however you’d like. This control will be used to open the OpenFileDialog. After you place that control on the form, double click it in the designer. This will automatically create a .Click event handler for that control in the forms code. Inside that Event Handler, type or paste the following code:
Dim csv As New OpenFileDialog()
csv.InitialDirectory = Environment.GetFolderPath(Environment.SpecialFolder.MyComputer)
csv.Filter = "csv (*.csv)|*.csv"
csv.ShowDialog()
Dim filelocation As String = csv.FileName
The first line of code, Dim csv As New OpenFileDialog() creates a new OpenFileDialog object. This object allows you to be able to open a file explorer window, and select a file that you will later be able to manipulate.
The second line changes the InitialDirectory property of the OpenFileDialog object. This property just changes the directory that the file explorer will open in when you trigger the dialog. Its recommended that you choose a library to open (Downloads, Documents, Music, Pictures, Videos, etc.) instead of a specific file location. This property isn’t necessary, but it makes it a little more convenient for the user, so I’d recommend it. In this case, we make the InitialDirectory the Downloads folder using Environment.GetFolderPath(Environment.SpecialFolder.MyComputer).
The third line of code sets the filter property of the OpenFileDialog. This means the user will be limited to selecting files with only the specified filter. In the code, the first part of the filter property (the text on the left of the “|”) is the description of the filter. This is the text that will be displayed in the little filter dropdown in the bottom right of file explorer. The second part of the filter property (the text on the right of the “|”), is the actual filter pattern. I’m not going to go in depth explaining all the different things you can do with the filter pattern, but know that in our code, the asterisk (*) is a wildcard, meaning the files can have anything in its filename before the “.csv” part. This effectively only lets the user select files with the file extension of “.csv”. in the OpenFileDialog.
The fourth line of code finally shows the file explorer window (the actual dialog part), with all the properties we just set. When we use .ShowDialog, it disables all interaction with the main form or forms until the dialog window is closed (or in our case it could also be when a file is selected).
The fifth line of code creates a new variable called filelocation and just gets the file location of the file we just selected in the OpenFileDialog.
After you finish getting the previous code, create a new global string variable called CSVLocation or whatever you’d like to call it. We will set this variable equal to the file location we get from the OpenFileDialog. To do this, write or paste the following code after the previous code:
If FileIO.FileSystem.FileExists(filelocation) Then
        CSVLocation = filelocation
Else
        Exit Sub
End If
This code checks if the file we got from the OpenFileDialog exists, and if it does, sets the global CSVLocation variable equal to it. If it does not exist, it exits the Sub. This is very useful because if the user closes the OpenFileDialog instead of selecting a file, the filelocation variable will equal Nothing and will exit the Sub instead of continuing and breaking stuff later on.
TextFieldParser
What is TextFieldParser?
The TextFieldParser object is a built-in class in VB.NET that provides an easy way to parse and extract data from text files. It works by opening a file and then reading its contents one line at a time. The object allows you to specify different types of delimiters such as commas, tabs, or spaces, and it can handle both fixed-width and delimited fields.
Another useful feature of the TextFieldParser object is its ability to handle quoted text fields that contain delimiters within them. This is a common scenario when working with CSV files, for example. The object can identify the beginning and end of a quoted field and extract the text within it correctly.
Overall, the TextFieldParser object simplifies the process of reading and parsing text files in VB.NET, and can save you a lot of time and effort when working with large or complex data sets.
Continuing the Code
Okay, now that we have the file location of the CSV file, we can start writing the code to actually parse it. Copy and paste this Question class into your Module:
Public Class Question
        Private _QuestionString As String
        Public Property QuestionString As String
            Get
                Return _QuestionString
            End Get
            Set(value As String)
                _QuestionString = value
            End Set
        End Property

        Private _AnswersArray As String()
        Public Property AnswersArray As String()
            Get
                Return _AnswersArray
            End Get
            Set(value As String())
                _AnswersArray = value
            End Set
        End Property

        Private _CorrectAnswer As Integer
        Public Property CorrectAnswer As Integer
            Get
                Return _CorrectAnswer
            End Get
            Set(value As Integer)
                _CorrectAnswer = value
            End Set
        End Property
    End Class
This is the class we are supposed to use to store the data for each Kahoot question that is read from the csv. It will hold the question, answers, and the correct answer number of each question.
After you have that pasted, create a new Function called PackQuestions and have it accept a String parameter called fileLocation. Make the return type of the Function an Array of Question. Once you do that, it should look something like this:
Private Function PackQuestions(fileLocation As String) As Question()
End Function
The fileLocation parameter will be the file location of the csv that this function will pack into an array of Question.
Now its time to add some stuff to this function. Copy and paste all this inside of the function:
Dim questionList As New List(Of Question)
Dim parser As New TextFieldParser(fileLocation)
parser.SetDelimiters(",")
parser.TrimWhiteSpace = False
parser.ReadLine()
While Not parser.EndOfData
    Dim fields As String() = parser.ReadFields
    Dim question As New Question
    question.QuestionString = fields(0)
    Dim answerArray As New List(Of String)
    For i As Integer = 1 To 4
        If fields(i).Length >= 0 Then
            If Not fields(i) = "" Then
                answerArray.Add(fields(i))
            End If
        End If
    Next
    question.AnswersArray = answerArray.ToArray()
    question.CorrectAnswer = fields(6)
    questionList.Add(question)
End While
Return questionList.ToArray()
In this code, a new List of Question is defined, called questionList. This list will hold all the data we get from the csv. The next line of code, Dim parser As New TextFieldParser(fileLocation), defines a new TextFieldParser object called parser. This object will be used to read the file we pass into it. I did this with the fileLocation variable as the parameter. The fileLocation parameter sets what file location the TextFieldParser will read from. The next two lines, lines three and four, set the properties of the TextFieldParser.
The .SetDelimiter property is necessary to tell the TextFieldParser what it should use as its delimiter, or the character/string that will be used to split the .csv apart. I just realized you don’t really need the line of code that sets the .TrimWhiteSpace property because its off by default, but if you want to use it, just set that equal to True. It basically just trims each string that is split apart.
Next up is the While Loop. It loops while parser.EndOfDate is False, or in other words there is still data to be read in the .csv.
Inside the While Loop on line 7, a new variable is defined called fields, and it is set equal to parser.ReadFields. The .ReadFields method reads the current line, and splits it apart at the delimiter. It then returns an array of all the split apart strings. So now we have all the data from a single line in the .csv and we need to create a new Question object to hold this data. So in line 8, we define a new Question object called “question”. The Question class is the class we made earlier to store all the data from the csv. So now, in line 9, the QuestionString property of question is set to fields(0). According to the csv format we used for this project, the first item in a single line is the actual question part of the question, so for example, it might hold the string “What is 7 + 19?” or something like that. Now we need to set the AnswersArray property of the question object. First create a new list of string objects called answerArray. Then create a for loop that loops through the next four items inside the fields array and appends them to the list (if they’re not empty). These four (or less) items will hold all the answers to the question. Outside of the loop, set the AnswersArray property of the question object equal to answerArray.ToArray(). Now all we have left to do is to set the CorrectAnswer property of the question object. So just write question.CorrectAnswer = fields(6). This sets the CorrectAnswer property of the question object equal to the sixth item in the fields array, which according to the .csv format we used for this project, is the correct answer number. Now that we have all the properties set, we can add the question object to the questionList list. So just copy the code on line twenty (questionList.Add(question)). Now the code is nearly complete. All that’s left is to add the Return statement to the function, so add a line of code that reads Return questionList.ToArray(). We had to convert the list to an array because the return type of the function was an array, not a list.
Now that the function is completed, we are going to put it into action. Place a new button on the form and set the text property to “Write Data to Console”. Then double click that button to create an event handler. Inside that event handler, define a new variable called dataArray and set it equal to the PackQuestions function with the global CSVLocation variable as its parameter. I’m not going to explain the writing to the console part, since it should be pretty self explanatory based off of what we already did, so here’s the code (paste it after the dataArray variable is defined):
For i As Integer = 0 To dataArray.Count - 1
          Console.WriteLine(dataArray(i).QuestionString)
          For x As Integer = 0 To dataArray(i).AnswersArray.Length - 1
                       Console.WriteLine(vbTab & String.Format("{0}. ", x + 1) & dataArray(i).AnswersArray(x))
          Next
          Console.WriteLine()
          Console.WriteLine(vbTab & "Correct Answer: " & dataArray(i).CorrectAnswer)
          Console.WriteLine()
Next
Now you should have a working but very basic .csv parsing tool.
Some things to note is that the program will break if you try to write the .csv to the console before its selected and that this program isn’t really that amazing. There are a lot of things that could probably be improved with this code and tutorial, but this is only to show you the basics.
If you don’t understand something or just need help, ask me in class. I’ll be happy to help (probably).