
Introduction
If you’re thinking of building a mobile app, React Native is an excellent choice. It allows you to develop cross-platform apps using JavaScript, which saves time and effort. In this guide, I’ll walk you through how to start a React Native app, leveraging both personal experiences and industry best practices.
Time To Complete Process: 4-5 Months
Your Developer Setup
Before diving into React Native, ensure you have the following:
- Node.js and npm: React Native requires Node.js, which comes with npm to manage packages.
- A Code Editor: I recommend Visual Studio Code because it has great extensions and is easy to set up.
- Android Studio: If you plan to test on Android, you’ll need Android Studio, which includes the Android SDK.
- Expo Go: Expo simplifies the development process, and I’ve personally used it when building projects like the ‘Ects Ecosystem’ and Offline Games. It allows you to run your app without needing Xcode or Android Studio for initial development.
Installing React Native
There are two ways to create a React Native app: via Expo CLI or React Native CLI.
Using Expo CLI (Recommended for Beginners)
Expo is a framework that helps speed up the React Native development process. You can bypass complex configurations with Expo.
Steps:
- Install Expo CLI globally:
npm install -g expo-cli - Create a new project:
expo init MyNewAppWhen asked, choose a template (like Blank). - Navigate to the app directory:
cd MyNewApp - Start your app:
npx expo start --tunnelScan the QR code with your Camera app. This will take you to Expo Go. (available for both iOS and Android).

Advantages of Expo:
- No need for Xcode or Android Studio to test on your phone.
- Great for quick prototyping, which I found useful during my ‘Ects Ecosystem’ App.
Using React Native CLI (For Advanced Users)
If you need more control or plan to use custom native modules, go with React Native CLI.
Steps:
- Install the React Native CLI:
npx react-native init MyNewApp - Navigate to your project:
cd MyNewApp - Run the app on iOS or Android:
- For Android:
npx react-native run-android - For iOS (requires Xcode):
npx react-native run-ios
- For Android:
I generally recommend starting with Expo unless you have experience working with native code, as I avoided using Xcode and focused on Android for projects like ‘Offline Games’.
Project Structure Overview
When you first create a React Native project, it’s essential to understand the file structure.
- App.js: The main entry point of your app. In most of my projects, such as Insight Pro and Offline Games, I typically organize my screens from here.
- /components: You can add reusable components here.
- /screens: Create separate folders for your app’s screens. For example, in Ects Ecosystem, I created individual screens like
SettingsScreen,EditProfileScreen, andHomescreen.
Adding Navigation to Your App
React Navigation is the most popular library for adding navigation to a React Native app. This is essential, especially if you’re working on projects with multiple screens, like the Ects Ecosystem App.
Steps:
- Install React Navigation:
npm install @react-navigation/native - Install the dependencies for navigation:
npm install react-native-screens react-native-safe-area-context - Set up the navigation container: Modify
App.js:
import * as React from 'react';
import { NavigationContainer } from '@react-navigation/native';
import { createStackNavigator } from '@react-navigation/stack';

const Stack = createStackNavigator();

function App() {
  return (
    <NavigationContainer>
      <Stack.Navigator>
        {/* Define your screens here */}
      </Stack.Navigator>
    </NavigationContainer>
  );
}

export default App;
Styling the App
React Native uses CSS-like styles, but they are written in JavaScript.
- Create a
styles.jsfile for each component. - Leverage libraries like
styled-componentsorTailwind CSS(React Native version) if needed.
For example, when building ‘Offline Games’, I wanted to maintain a retro look, so I chose specific color schemes and fonts, focusing more on visual aesthetics without complex elements like images.
Testing and Debugging
Testing on devices: It’s crucial to test your app on both Android and iOS for cross-platform compatibility.
Expo Go for quick mobile testing.
React Native Debugger or built-in React DevTools for debugging.
Publishing the App
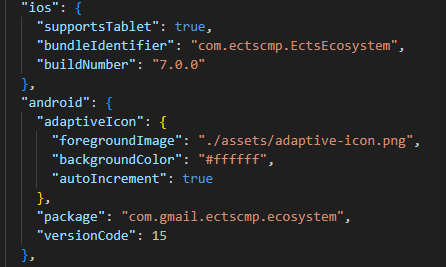
Make sure your app is production-ready by updating the app metadata like name, version, and build number in your app.json or app.config.js file.
Make sure you Update this file and save it before you start your build
Install Expo Application Services (EAS CLI)
- If you haven’t already, install the EAS CLI, which simplifies the build and submission process:
npm install -g eas-cli eas login
Run a Build
- To create your app binaries, run the following commands based on your target platform:
For Android:
eas build --platform android
For iOS:
eas build --platform ios
Note: For iOS, you need an Apple Developer account, and EAS CLI will help you set up provisioning profiles and certificates automatically.

Monitor Build Progress
- The build process runs on Expo’s servers. You can track the progress on the Expo dashboard or via the CLI. Once the build is complete, you’ll get a URL to download the APK (for Android) or IPA (for iOS).
Now that you’ve successfully completed your app’s build, it’s time to take the next big step: uploading it to the app stores and getting it into the hands of users.
But how exactly do you navigate the complexities of the Google Play Store and Apple App Store submission processes?
In my next article, I’ll guide you through uploading your Android and iOS builds, from creating developer accounts to managing store listings and ensuring your app meets the required guidelines for approval…….. CONTINUED